Showing posts with label cheese. Show all posts

Sunday, January 29, 2012

I like summer sausage!

Red wax gouda and summer sausage with apples is a perfect wintertime treat. Creamy cheese plus salty spicy meat plus crisp and fresh apples equals yummy.


Add a glass of prosecco and some friends and you have perfection. 

You know who else likes summer sausage?


This (almost 6 year old) guy!

The super bowl is the official cutoff date for summer sausage consumption. Shelf stable meat products can't possibly be good for us so we limit their consumption to the period of time between Christmas eve and the super bowl.

Monday, January 23, 2012

One Pot Mac and Cheese

My husband has a new job that requires him to travel. When he is traveling I learn things about myself. Namely I learned that when I cook, I make a lot of dishes. A lot is an understatement. There is an inverse relationship between the input of dishes and the output of food. I also leave all of the cabinet doors open. I should probably go tell Mark how much I appreciate him cleaning up after me and closing the cabinet doors.

Step one is admitting you have a problem. Step two is doing something about it so this weekend I made one pot (one colander, one cheese grater, one small cutting board, one whisk and three spoons) macaroni and cheese.

I apologize that there are no pictures to go along with this post. I have a history of burning dairy based sauces so I have focus on the task at hand.

To make you need:
  • Lots of Cheese: I used all of the leftover bits of cheese in my fridge, mostly sharp cheddar and some sharp provolone from Di Bruno Brothers that my friend Tammy brought to a recent get together,  plus a wedge of red wax Gouda. In total I had a gallon Ziploc storage bag a little more than 3/4 full for a total of about 2.5-3lbs of cheese. I am a firm believer that more cheese is always greater than less cheese.
  • 3 T Butter, real butter is preferred but you can use olive oil. "Light" anything will not work since it contains water and we need fat to create a roux.
  • 3 T Flour
  • 1 Cup Heavy Cream, it's high fat content helps prevent lumps especially when you are adding the milk cold like I do to keep the one pot thing going.
  • 1.5 Cups Milk, whatever you have is fine. I use whole milk since that is what we buy.
  • 1/4 Tsp Cayenne
  • 1/2 Tsp Garlic Powder
  • 1/2 Tsp Dry Mustard (optional) I couldn't find my dry mustard so I didn't use it and everything turned out fine.
  • 1 Box Noodles I used Wegmans Tortiglioni because my son picked it. You can use whatever you have.
  • Salt to taste
  1. In a large pot of salted water boil noodles according to package instructions for desired doneness level.
  2. Drain noodles into a colander and set aside while you prepare the sauce. Don't rinse.
  3. Add butter to pot and melt. Be careful about putting the pot back on the burner you were using to boil the water. The burners on my electric stove top stay hot enough to burn butter quickly for a few minutes after I have turned down the heat.
  4. As the butter melts it will foam up. Add the flour as soon as the foam starts to subside but before the butter starts to brown.
  5. With the burner on medium to medium low (4-5 out of 10 on my stove) mix flour and butter into a smooth paste with a wooden spoon. 
  6. Add cayenne, garlic powder and dry mustard. Stir to combine.
  7. Switch to a whisk and add the heavy cream whisking until smooth. The consistency will be a lot like papier-mache paste. Make sure to continuously scrape the corners and bottom to prevent lumps.
  8. Gradually add the milk, while whisking, in 1/2 cup increments until you have a smooth sauce base that coats the back of a spoon. There will be moments when you are certain that you have messed up and your sauce base is doomed to lumpy-ness but everything will be OK just so long as you keep whisking!
    1. You may need slightly more or less milk than called for. You want the sauce base to coat the back of a spoon and be almost a thick gravy consistency. If it seems too thick add milk a little at a time to thin.
  9. Once sauce base is at the right thickness reduce the heat to low and keep stirring, switching back to the wooden spoon. Start adding the cheese a handful at a time allowing each addition to melt into the sauce before adding more.
  10. Keep stirring making sure to scrape the bottom and sides of the pot.
  11. Once all of the cheese is added, taste and add salt as needed. Cheese can be very salty so how much salt you need depends on your taste. I added a good pinch to my sauce.
    1. At this point the sauce will have lumps of cheese in it depending on the type of cheese you selected. Lumps of cheese = good. Lumps of flour = bad.
  12. Add cooked noodles (which have been resting quietly in a colander) and stir to combine.
  13. Leave the burner on only long enough to warm up the noodles then turn the heat off.
  14. Serve immediately.
We ate the mac and cheese with BBQ pulled chicken that I made a few weeks earlier and stashed in the freezer. (I will post that recipe next) We had maybe two lunch size servings leftover after feeding four adults and three children.

It was especially awesome with the Kujo Imperial Coffee Stout from Flying Dog and ESB Amber Ale from Flying Fish that the DuBosar's brought.

PS: I lied. I took a photo with my phone of the leftover mac that I brought for lunch. The sauce breaks a bit when you microwave it but still tastes good.

Saturday, December 31, 2011

Fromage Fort

Dear Ryan and Tracy,

I intended to bring baked brie to your house for new years eve but it blew up in a big way and all the cheese drained out of the bread. See:

FAIL!

So, remembering #42 (coincidentally the answer to life, the universe and everything) in Saveur's  "The Saveur 100" list I made Fromage Fort from exploded baked brie. You're welcome!

To make:

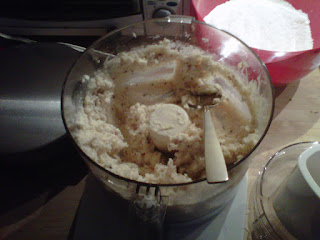
Fill the bowl of your food processor with leftover cheese. For me that was the melted insides of a wheel of brie, some leftover white stilton with cranberries and some syrah soaked toscano from Trader Joe's. Add 1/4 cup dry white wine (I had cava so that's what I used) and a clove of garlic. Pulse until it looks like this:


I am going to serve this with raisin rosemary crackers from Trader Joe's but whatever you have will be fine. I didn't measure the cheese and it worked out really well. If you are not a kitchen gambler you can follow this recipe here.

Sunday, December 18, 2011

Baked Brie

My first baked brie was based on an appetizer served at Reading, PA’s somewhat famous Peanut Bar*.  The Peanut Bar version was a brie en croute, a small brie wheel baked in phyllo with nuts and drizzled with honey. It was delicious but it was served with only a few crackers and begged for more bread. Shopping with my mom, we found similar wheels of brie at BJ’s and decided to marry them with frozen bread dough since I didn't then and don’t now have the patience for home made yeast bread. The first one exploded in the oven. The following recipe has been tweaked over the years and is beloved by many.

To make you need:

1 6” diameter brie wheel** plus one loaf worth of frozen bread dough. 12” diameter brie would need two loaves worth of dough. Pillsbury French or Italian loaf in a can works well as does Wegman’s pizza dough since it is nice and bready. Trader Joe’s pizza dough is gross, don’t ever use it. Puff pastry is traditional but I think it ends up too greasy.

Also honey, salt and fruit of choice, I like grapes.

  1. Thaw dough and let rise in an oiled bowl based on package directions.
  2. Allow cheese to come to room temperature. Cold cheese has caused dough to be brown on the outside and raw on the inside on more than one occasion.
  3. Preheat oven to 350F or whatever temperature your package of dough suggests.
  4. Punch it down and form into a circle. (Don’t use flour, you want the dough to stick together and seal in the brie.)
  5. Place brie wheel in center of dough wheel and wrap like package by joining opposite ends.
  6. Place brie seam side down on a parchment lined rimmed baking sheet. This is critical. Even if you follow the next step to a tee the brie can still explode and leak out the side. The parchment will keep exploded brie from sticking and the rim will keep it from dripping all over your oven.
  7. Pierce the top of the dough penetrating into the rind of the brie a few times using a small knife. You can make a pretty pattern if you are feeling festive or just poke at random. 
  8. Bake according to dough package instructions, which will be something like 30-40 min at 350F.
  9. Baked brie is finished when it is golden brown and sounds hollow when tapped. (Or when an instant read thermometer reads about 190F when inserted in the bread part.)
  10. Remove from oven and drizzle immediately with honey and sprinkle with salt.
  11. Allow brie to cool for at least 30 min to an hour before serving or molten cheese will run everywhere.
  12. I like to garnish with grapes for a party but it also goes well with White Bean Sausage Soup on a cold day.
 *Back then the Peanut Bar kitchen was run by my dad's friend Judy Henry. She is no longer there and now has a nearby restaurant Judy's on Cherry.
**I typically use President brie wheels. You can use Camembert or other brands but keep in mind that you would loose the nuance of a higher quality brie once you wrap it in dough and drizzle it with honey. If you can’t find wheels you can use wedges. I cut the wedge into two equal triangles and marry the longest sides to make a rectangle then wrap and bake as before. 

Here are the baked brie's I made for Christmas. One exploded, one didn't. Good times were had by all!